Burning your own Amiga ROMs (EPROMs)
With the release of the latest AmigaOS version (3.1.4) the package you could buy included ROM images to be used for either maprom (depending on your accelerator card tool support) or for burning it to a ROM.
Maprom is probably preferred, because it's more flexible, but not always possible. For instance the A3440 card can't do maprom. Or if you have no accelerator at all you can't do maprom either.
Which leaves only a few options. Either you can buy the ROM, have someone burn it or burn it yourself.
Here I want to show how it works to burn it yourself.
What you need:
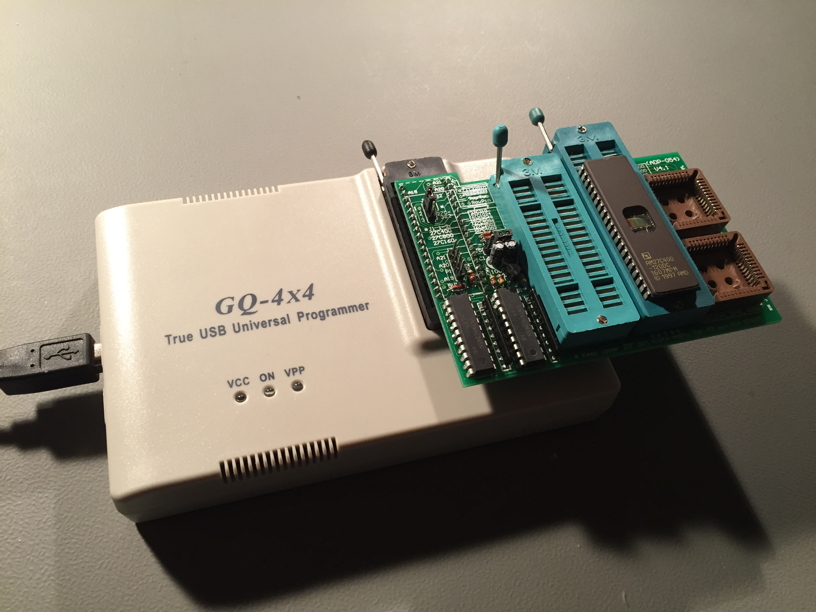
- an EPROM programmer. I have chosen the low cost GQ-4x4 USB programmer.
- to program the EPROMs used in an Amiga you have to get a 16-Bit 40/42 pin ZIF adapter board for the burner:
ADP-054 16 Bit EPROM 40/42 pin ZIF adapter
- an UV eraser, which can erase the EPROMs, in case something goes wrong.
- then you need EPROMs. The types used in A500/A600/A2000 are 27C400. I found the following to work which can be ordered in eBay: AMD27C400
- for burning ROMs for A1200/A4000 you need 27C800 / AMD27C800 roms, two of them to burn one ROM.
- and certainly a ROM image you want to burn.
Sometimes there are good offers at Amazon or eBay for a complete package (except the EPROMs).
You shouldn't pay more than €150 for the GQ-4x4, the adapter board and the eraser.
Here is a picture of the device with attached adapter board with an EPROM inside.
Then you need to download the software for the burner. That is a) the burner software itself named "GQUSBprg". The latest version as of this writing is 7.21.
And you need the USB driver 3.0.
Can be downloaded here: http://mcumall.com/store/device.html
When you connected the burner and installed the software we can start.
Now open the burner software. Make sure that there is no EPROM put in.
1. first step is to select the device, or the EPROM to burn.
Make sure you choose either AM27C400 or 27C400.
2. Next we'll make a voltage check to see if the burner has all voltages in order to properly burn the EPROM.
I found that while you can attached a power supply on the burner it is not required. The USB provides enough power.
3. Load the ROM image into the buffer.
When you load the image make sure you choose .bin (binary).
!!! This is important, or otherwise the programmed ROM won't work.
After you loaded the ROM image, you have to make sure to swap bytes.
This can be done in the 'Command' menu of the software.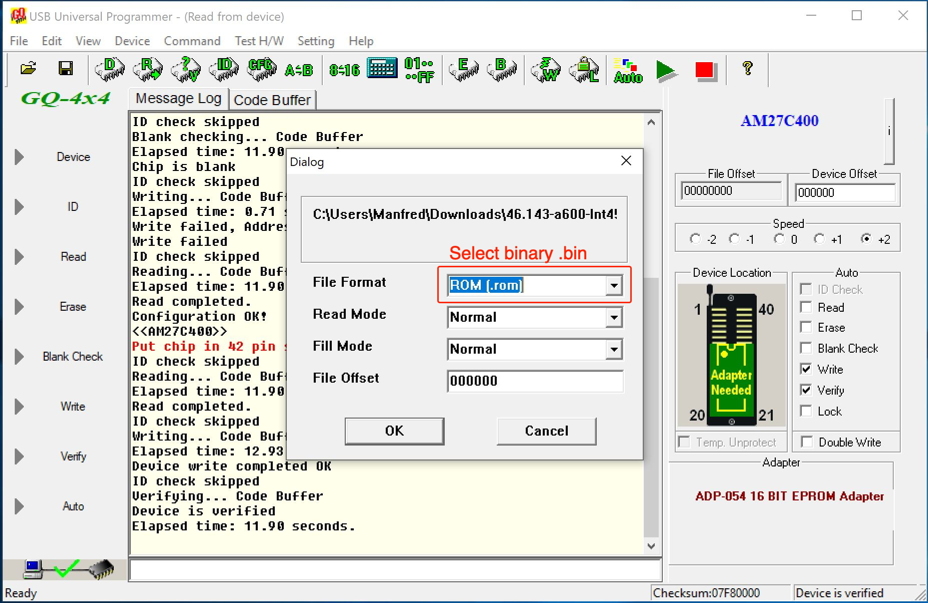
4. Now you have to put in your EPROM into the ZIF slot.
Make sure it sits tight and doesn't move anymore.
5. Make a blank check to see if the EPROM is empty.![]()
6. When the EPROM is blank we can write it.
When the write process is finished it's done.
You can take out the EPROM and put it into the Amiga and it should work.
Some notes:
Partly this whole process of writing the ROM was a real pain because the GQ burner would just stop writing at some address. And in fact I had to get the package replaced including the adapter board.
I had first tried it in a virtual machine (VMware Fusion on Mac) but this doesn't work for some reason as the GQ programmer detaches and re-attaches to the USB bus on some of the operations and that doesn't seem to be working reliably in a VM.
Update:
The Amiga 4000 can only use 512k EPROMs, hence only 27C400 will work. The Amiga 1200 can also use 27C800 (1MB). The byte-swap, if your ROM image is already byte-swapped, then you don't need to do this here. Some ROM images, which are ready to burn have this already. However, if you want to burn ROM images that are used in maprom or UAE, then you have to byte-swap.
-
[ACE BASIC 3.0.1 - Variable Arrays and 68000 Compat]
14-05-2026 -
[ACE BASIC 3.0 - Classes IEEE and More]
02-03-2026 -
[ACE BASIC - Structs RTG and More]
16-02-2026 -
[Developing with AI - Understanding the Context]
13-02-2026 -
[ACE BASIC - Closures MUI and More]
10-02-2026 -
[ACE BASIC - GadTools and More]
31-01-2026 -
[ACE BASIC - AGA Screen Support]
27-01-2026 -
[Polymorphism and Multimethods]
02-03-2023 -
[Global Day of CodeRetreat - recap]
07-11-2022 -
[House automation tooling - Part 4 - Finalized]
01-11-2022 -
[House automation tooling - Part 3 - London-School and Double-Loop]
02-07-2022 -
[Modern Programming]
14-05-2022 -
[House automation tooling - Part 2 - Getting Serial]
21-03-2022 -
[House automation tooling - Part 1 - CL on MacOSX Tiger]
07-03-2022 -
[Common Lisp - Oldie but goldie]
18-12-2021 -
[Functional Programming in (Common) Lisp]
29-05-2021 -
[Patterns - Builder-make our own]
13-03-2021 -
[Patterns - Builder]
24-02-2021 -
[Patterns - Abstract-Factory]
07-02-2021 -
[Lazy-sequences - part 2]
13-01-2021 -
[Lazy-sequences]
07-01-2021 -
[Thoughts about agile software development]
17-11-2020 -
[Test-driven Web application development with Common Lisp]
04-10-2020 -
[Wicket UI in the cluster - the alternative]
09-07-2020 -
[TDD - Mars Rover Kata Outside-in in Common Lisp]
03-05-2020 -
[MVC Web Application with Elixir]
16-02-2020 -
[Creating a HTML domain language in Elixir with macros]
15-02-2020 -
[TDD - Game of Life in Common Lisp]
01-07-2019 -
[TDD - classicist vs. London Style]
27-06-2019 -
[Wicket UI in the cluster - reflection]
10-05-2019 -
[Wicket UI in the Cluster - know how and lessons learned]
29-04-2019 -
[TDD - Mars Rover Kata classicist in Scala]
23-04-2019 -
[Burning your own Amiga ROMs (EPROMs)]
26-01-2019 -
[TDD - Game of Life in Clojure and Emacs]
05-01-2019 -
[TDD - Outside-in with Wicket and Scala-part 2]
24-12-2018 -
[TDD - Outside-in with Wicket and Scala-part 1]
04-12-2018 -
[Floating Point library in m68k Assembler on Amiga]
09-08-2018 -
[Cloning Compact Flash (CF) card for Amiga]
25-12-2017 -
[Writing tests is not the same as writing tests]
08-12-2017 -
[Dependency Injection in Objective-C... sort of]
20-01-2011